- How to Edit or Delete a Data Source
- Using Multiple Data Sources in the Same Document
- Where Are Data Sources Stored?
- Sharing Data Sources
How to Edit or Delete a Data Source
How to edit a data source from the DataLinker palette
To edit a data source:
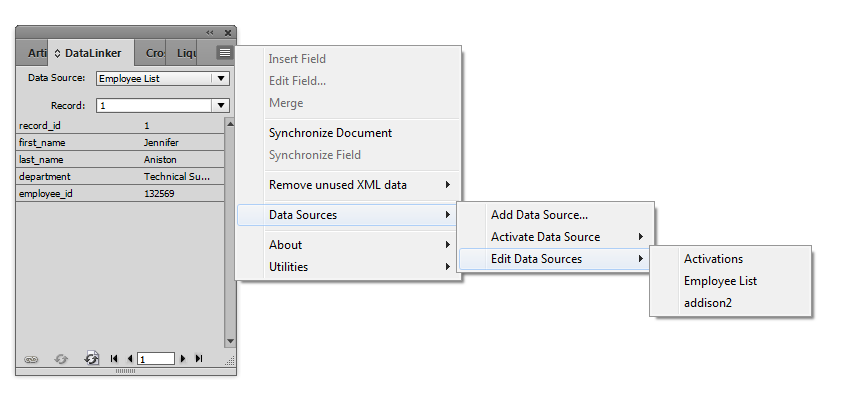
- Choose Data Sources > Edit Data Source from the DataLinker or palette flyout menu
- A list of data sources appears as a submenu. Choose the data source you want to edit.
- The edit data source dialog appears
To delete a data source
- Repeat the steps above to show the edit data source dialog
- Click the “Delete” button.
Using Multiple Data Sources in the Same Document
It is easy to link data from multiple data sources to a single document. First, you need to have multiple data sources added. Then, activate your data source by using the flyout menu from the palette or the main DataLinker menu, or from the dropdown on the DataLinker palette.
Add the data to the document from your first data source. Once you are done, activate another data source, and add data to the document from the second data source. Now, when you synchronize data from the document, data will be synchronized from both data sources at once.
Where Are Data Sources Stored?
Data sources are shared by all documents in an application. Information about your data sources is placed in a file called DataLinker.xml, stored in your "Roaming" InDesign preferences folder - here's Adobe's help page on where you can find that preferences folder.
In the Roaming Preferences folder, look for DataLinker > DataLinker.xml. That XML file is your data source file.
If you don't want to hunt down the file in your file system, you can also export and import it from within DataLinker. See the following subject, "Sharing Data Sources," to see how.
Sharing Data Sources
You can share your data sources by first exporting them to a file on your local machine. Then you can send the file to someone else, and they can import the data sources.
To export your data sources:
- Choose Utilities > Data Sources > Export Data Sources from the DataLinker menu
- A folder chooser dialog appears. Choose where you want to save your data sources.
- A file called "DataLinker.xml" is saved. This contains your exported data sources.
To import data sources:
- Choose Utilities > Data Sources > Import Data Sources from the DataLinker menu
- Navigate to the "DataLinker.xml" that contains your data sources.
- A warning appears that the imported data sources will overwrite your existing data sources.