- How to edit fields to format data
- Sttings for alphanumeric fields
- Settings for Numerical Fields
- Settings for Currency Fields
- Settings for Percent Fields
- Settings for Image Fields
- Settings for Barcode Fields
How to edit fields to format data
DataLinker can automatically format text as it is placed into a document according to settings created for each field. To define formatting settings for an individual field:
- In the DataLinker palette, select the field whose settings you want to edit.
- Select “Edit Field” from the from the right click menu or the flyout menu in the DataLinker palette.
- A “Field Options” dialog will pop up. Select the type of data in this field. Your options are Alphanumeric, Numerical, Currency, Percent, Image and Barcode (requires BarcodeMaker). Each data type offers its own settings, which we’ll talk about further down.
- Once you have chosen all your settings, click OK.
- Now, every time you insert data or field names from the database, the formatting settings defined for that field will be used.
Settings for alphanumeric fields

Alphanumeric is a catch-all phrase for generic text. These are the settings you can use when setting up an alphanumeric field:
- Strip Whitespace – if checked, DataLinker will remove any “whitespace” (spaces and tabs) that occur in the database before and after the data and then insert the data into the InDesign document.
- Hide Prefix/Suffix if empty – If checked, DataLinker will hide the text in the prefix and suffix fields if there is not data coming from the data source for this record.
- Character Style – This dropdown lists the character styles defined for a document. Choosing one will cause DataLinker to apply the character style to the data when it is placed into the document.
- Prefix – DataLinker will prepend the text entered here to the data when it is placed into the document.
- Suffix – DataLinker will append the text entered here to the data when it is placed into the document.
Note: In the Prefix and suffix fields, you can use any of the special characters that are available in the Text tab of InDesign’s Find/Change dialog. For example, ^t is a tab, ^p is a paragraph break, and so forth. You can see all the special characters available to you by looking in InDesign’s Find/Change dialog.
- Regex Find String – a GREP regular expression that will search the incoming data.
- Regex Replace String – a GREP regular expression that will replace data found by the Regex Find String.
Note: In the Regex fields, you can use any of the special characters that are available in the GREP tab of InDesign’s Find/Change dialog. For example, you can use \t for a tab, or ~for a bullet character.Note: You can use suffixes in conjunction with the “Hide Prefix/Suffix if empty” option to completely hide an empty field. Instead of putting your return character in the document, you can place it in the suffix field using the ^p special character. Then, if you check “Hide Prefix/Suffix if empty,” you will avoid a blank line if the field is empty.
Settings for Numerical Fields
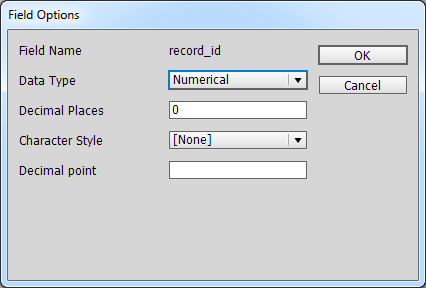
The settings for numerical fields are identical to alphanumerical fields, except that “Strip Whitespace” is replaced by “Decimal Places.”
- Decimal Places – The number of decimals that DataLinker will require to appear after the number when placed into an InDesign document.
Settings for Currency Fields

The settings for currency fields are identical to alphanumerical fields, except that “Strip Whitespace” is replaced by “Currency Symbol.”
- Currency Symbol – Place the symbol you would like to use.
- Force Decimals – If selected, DataLinker will append two decimal places to the numbers, even if they don’t exist in the database.
Settings for Percent Fields

The settings for percent fields are identical to numerical fields. The only difference is that the percent sign will be appended to the end of the data.
Settings for Image Fields

You can insert images from a database using DataLinker. An image will be inserted inline into the text stream, and you can select an object style to define how the image is anchored. The database field must contain the exact name of the image to be used, and all images that a field refers to must reside in the same directory.
- Object Style – Choose the object style that will be applied to the graphic frame.
- Picture Format – Use these options to fit an image and its containing frame together. Your options include Top Left, Fit Frame to Content, Fit Content to Frame, Fit Content Proportionally, Fit Frame Proportionally, or Center Content.
- Image Folder – Click on the Choose... button to navigate to the directory containing the images. This will be the full path to the directory containing the images on your hard drive, or blank if your data has full URIs (see note below).
Note: The data in your data source can be in two formats:
- Just the name of the image file (for example, "MyImage.png")
- The full URI to the image file (for example, "file:///full/folder/path/myImage.png")
If the data has just the image file name, then the Image Folder field should have the full path to the folder containing all your images, but if your data has full URIs, then the Image Folder field should be blank. Using full URIs in your data allows you to have images in multiple locations.
Settings for Barcode Fields

If Teacup’s BarcodeMaker and PatternMaker plug-ins are present, you can have DataLinker automatically insert a field as a barcode. The data in the field will be encoded by the barcode of your choice.
- Object Style – Choose the object style that will be applied to the inline or anchored graphic containing the barcode
- Picture Format – Use these options to fit an image and its containing frame together. Your options include Top Left, Fit Frame to Content, Fit Content to Frame, Fit Content Proportionally, Fit Frame Proportionally, or Center Content.
- Barcode Type – Choose the type of barcode that will be used to encode the data. You have over barcode types to choose from.
- Configure – Brings up the “Configure Barcode” dialog that allows you to map multiple database fields to multiple barcode parameters. See “Configuring a Barcode” below.
- Regex Find String – a GREP regular expression that will search the incoming data.
- Regex Replace String – a GREP regular expression that will replace data found by the Regex Find String.
Note: The Regex fields are useful for when the barcode data in the database is formatted in a way that BarcodeMaker won’t accept. For example, if you have a bunch of EAN barcodes in your data source, but they have a dash somewhere in the barcode, BarcodeMaker won’t be able to encode the barcodes because of the dash. You can use the Regex Find/Replace strings to remove the dash before the data goes into BarcodeMaker.